About Me

Edi Gunawan Naibaho
Lihat profil lengkapku

Rabu, 15 Agustus 2012

virtualbox

Installing Ubuntu in VirtualBox on a Windows 7 Host

It’s Sunday afternoon and Deb is feeling poorly…but not so poorly that she’s not offering considerable editorial input into this post. In between the sniffles and requests for lemsip etc…she’s throwing in various comments relating to various icons from the sci-fi genre. To be fair, I have borrowed her laptop as it’s the only one in the house running Windows 7.
I will attempt to minimize the in-jokes and references but I thought I’d better go on record and report the fact that I am under some duress here. Honestly, some people are soooo geeky !
What I want to do in this post is to go through :
  • setting up VirtualBox and running Ubuntu as a guest os
  • getting the Guest desktop to display in a full screen
  • getting the Number Keypad to work in the VM
  • setting up a directory so that files can be shared between guest and host

The Three Laws

Just a quick note about terminology.
Host – is the Windows 7 OS that we’re going to install all this stuff on
Guest – is the Ubuntu machine that we’re going to be running in the Virtual Machine

To boldly go…

The first steps in our brave new (virtual) world ( don’t worry, she’s got to go to the loo sometime), is to install the Oracle VirtualBox VM. You can get it from here.
Next, we need to get a copy of Ubuntu. Best bet is to use the latest Long-Term Support version ( currently Ubuntu 10.04.2) from here.
Just follow the wizard steps to install VirtualBox.
When you configure the new VM through the wizard, select the appropriate Operating System ( in this case, Linux) and Version (Ubuntu) then accept all of the other defaults for now.
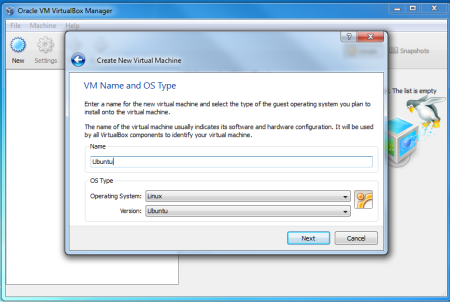
It's just an empty shell...for now
When you actually start the new VM for the first time, you’ll be presented with the First Run Wizard. Moving swiftly on ( before Deb gets in with any Harry Potter references), you’ll get a screen asking you to Select Installation Media.
Just select the Ubuntu iso you downloaded earlier.
A Wizard's Staff has a knob on the end...
Once you get Ubuntu desktop up, then click the install icon on the desktop. Note – at this point, you’re Numeric Keypad will not be working. We’ll fix this a bit later, but for now, you need to use the number keys above the letters on your keyboard.
Once you’ve done this, you need to make sure that the virtual cd/dvd is removed from the virtual cd/dvd drive before you virtually re-start the virtual machine. Hmmm, no response. Somehow I think she may not have seen Tron.
Anyway, the easiest way to do this is to go to the VirtualBox Devices Menu, select CD/DVD Devices / Remove Disk From Virtual Drive
When you reboot, you should now be running the installed version of Ubuntu and not just the live CD image in the VM.

We can rebuild him….

Moving swiftly on from Deb’s musings on the subject of exactly which bits of Steve Austin were bionic, the next step is to install Guest Additions in Ubuntu.
Before doing this it’s a good idea to run Update Manager in the Ubuntu guest ( System / Administration / Update Manager). This is because, if you have a linux kernel update, it does tend to mess up the Guest Additions installation and require a re-install.
With Ubuntu up and running in the VM, go to the VirtualBox Devices Menu and select Install Guest Additions.
This should load a CD into the virtual drive. You then need to navigate to the cd in Nautilus ( Places / Computer/ CD/DVD Drive) and then click autorun.sh. When prompted, just click the Run button.
Once the installation is complete, do a shutdown of the virtual machine ( removing the virtual CD/DVD first).
Virtually removing the virtual disk

I canna change the laws o’ physics

However, we can now start to address some of the issues with which we are currently faced.
First up is getting the Ubuntu Guest to display fill-size in fullscreen mode. This is especially useful if you happen to have two monitors at your disposal as you’ll be able to use one for the host and one for the guest.
With Ubuntu shut down, amend the Display settings for the VM in VirtualBox. The Video Memory should be set to 64MB and the Enable 3D Acceleration checked.
amend the display settings
Now, when you go into the Ubuntu System Menu and select Preferences / Monitor, Ubuntu should recognize the monitor type VBX. Additionally, you’ll also be able to increase the resolution to something in-line with what’s running on the host.
Once these changes have been made, switching the VM to fullscreen mode ( VirtualBox Menu, Machine / Fullscreen) should now result in the desktop taking up all of the available real-estate.
The Numeric Keypad can also be enabled by means of settings in the Ubuntu System/Preferences Menu. This time, go to Keyboard.
First of all, in the Mouse Keys tab, uncheck Pointer can be controlled using the keypad.
Secondly, in the Layouts tab, click Options… and under Numeric Keypad Layout Selection check Legacy. The Number pad should now work.
Ubuntu Keyboard settings

Sub-space transmissions

Although the clipboard is set to be bi-directional by default, it would seem that, with the Win7 host / Ubuntu guest combination at least, you can only cut and paste from the Host to the Guest and not the other way around.
You can, however, set one or more host directories to be visible to the guest OS and use this as a means of transferring files between the two.
First, we need to create the shared folder in windows ( I slapped mine on my Windows Desktop). Let’s assume it’s called vShare.
Now we need to set it up in Virtual Box. So, with the Ubuntu VM powered down, go into Settings / Shared Folders. Select the folder you want to use as the share and click OK. Note – you shouldn’t check either the Read-Only or Auto-Mount boxes. Also, avoid underscores in the folder name as these don’t seem to work too well for some reason.
specify the shared folder in Virtual Box
Now, when you start the Ubuntu guest again, you need to mount the share ( note that the mount-point name in the guest needs to be different from the name of the shared folder on the host) :

1$ sudo mkdir /mnt/hostShare
2$ sudo chmod 777 /mnt/hostShare
3$ sudo /sbin/mount.vboxsf –w vShare /mnt/hostShare
Note that if you’ve chosen a different name for your shared folder, use the name of the folder that’s shown in the VirtualBox Devices / Shared Folders dialog box.
To get the share to load everytime you startup the Guest os, you need to edit /etc/rc.local and add the following line :
/sbin/mount.vboxsf -w vShare /mnt/hostShare
To make it easier to get to from within the host, you can put a symbolic link on the desktop :
$ ln –s /mnt/hostShare $HOME/Desktop/host_share
A folder called host_share should now appear ( or materialize, if you prefer, ) on your Ubuntu desktop.

Escaping the Mirror Universe

By now, you will have noticed that, by default, Ubuntu has it’s Window control buttons on the left of the Window title bar rather than the right. If this is starting to get on your nerves…
On the Ubuntu Desktop, hit Alt + F2.
In the Run Application box that appears , type in gconf-editor and hit Run.
In the tree menu in the left-hand pane now navigate to apps/metacity/general
Right-click button_layout in the right-hand pane then click Edit Key.
Change the settings to menu:maximize,minimize,close
The buttons should now magically have switched sides.

The Final Frontier

As I’ve nearly exhausted Deb’s supply of Star Trek references, I’ll leave you with this thought :
Klingon programs do not have parameters, they have arguments…and they ALWAYS WIN THEM

Sabtu, 11 Agustus 2012

langkah2 instalasi redhat

LANGKAH – LANGKAH INSTALASI LINUX REDHAT

LANGKAH – LANGKAH INSTALASI LINUX REDHAT

Persiapan Instalasi
Beberapa hal yang patut anda catat sebelum memulai instalasi adalah :
1. siapkan PC yang memungkinkan untuk menginstal linux

2. siapkan CD instalasi Linux yang akan anda instal
Memulai Instalasi
1. Setting BIOS pada komputer, agar booting pertama dari CD-Drive.

2. Masukkan Disk ke 1 dari 3 CD Red Hat ke dalam CD-Drive. Tunggu beberapa saat hingga tampil pilihan untuk memulai instalatasi Red Hat tersebut | tekan tombol Enter.
Tampilan awal boot

3. Tunggu beberapa saat akan muncul pilihan bahasa selama proses instalasi seperti gambar berikut :
Kotak dialog pilihan bahasa

4. Klik tombol Next. Kemudian akan tampil jendela pilihan untuk keyboard.
Kotak dialog konfigurasi keyboard
5. Klik tombol Next. Kemudian akan tampil jendela pilihan untuk mouse, klik sesuai dengan mouse yang digunakan.

Kotak dialog konfigurasi keyboard
6. Klik tombol Next. Kemudian akan tampil jendela pilihan untuk upgrade atau install

Kotak dialog Upgrade

7. Pilih Perform a New Red Hat Linux Installation, Kemudian klik tombol Next.
8. Tentukan pilihan untuk instalasi yang diinginkan, klik Next
Kotak dialog pilihan jenis instalasi
1 Personal Desktop Aplikasi offices dan Multimedia 1.8 GB
2 Workstation Komputer kerja untuk jaringan dan developer/ programmer. 2.1 GB
3 Server Komputer sebagai server dengan aplikasinya 1.5 GB – 4.85 GB
4 Custom Menentukan sendiri paket sesuai kebutuhan 500 MB – 4.85 GB
9. Pilih bentuk partisi yang diinginkan : Automatically Partition atau Manually Partition with Disk Druid
Kotak dialog pilihan jenis partisi

*) Membuat tiga partisi, masing-masing untuk windows, linux dan data. Sehingga jika anda ingin menghapus/ uninstal Linux atau Windows, data-data penting anda tidak turut hilang.
Skema susunan partisi
*) Didalam sebuah Harddisk terdapat konsep partisi yang terdiri dari Partisi Primary, Partisi Extended dan Partisi Logical. Didalam partisi primary terdapat Master Boot Record (MBR) untuk melakukan proses boot loader dari suatu sistem operasi.

10. Pilih Manually Partition with Disk Druid untuk membuat partisi Linux, dan secara default, Anda cukup untuk membuat partisi :
1 . /boot ———-> EXT3 / Linux Native ——-> 100 MB
2 . / ————–>EXT3 / Linux Native ——–>4000 MB
3 . swap ———–>Swap ————->2 x jumlah memori yang terpasang pada komputer

Kotak dialog pembagian partisi
Pilih tombol NEW pada kotak dialog Partitioning. Lalu isikan di kolom Mount Point “ / ”. Untuk file system, pilih Linux Native. Isikan kolom size sisa dari hardisk anda yang masih kosong. Lalu pilih OK kemudian pilih Next.

Kotak dialog menentukan sistem file
11. Setelah selesai pembuatan partisi maka akan ditampilkan konfigurasi untuk boot loader Lalu pilih Next, sehingga muncul tampilan sebagai berikut :
kotak dialog boot loader
12. Jika anda berencana menghubungkan komputer ke jaringan, isikan data yang diminta. Jika tidak biarkan kosong. Pilih Next.
Kotak dialog konfigurasi jaringan
13. Kemudian muncul kotak konfigurasi firewall. Biarkan kosong jika anda tidak menghubungkan komputer dengan jaringan.
Kotak dialog konfigurasi Firewall
14. Pilih Next , muncul tampilan berikut yang meminta anda mengisikan jenis bahasa yang akan digunakan oleh RedHat nantinya.
Sell Links On Your Site

Kotak dialog konfigurasi bahasa tambahan
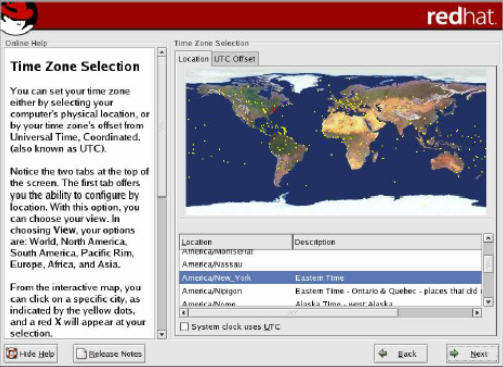
15. Pilih Next untuk melanjutkan. Sehingga tampil setting waktu.
Kotak dialog konfigurasi tanggal
16. Pilih Next untuk melanjutkan. Masukkan Password untuk root, yang merupakan super user. Klik tombol Next dan tombol Next kembali.


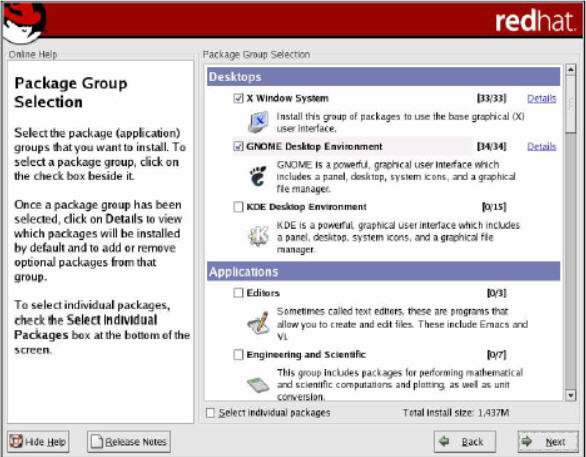
17. Tentukan paket-paket apa saja yang akan di Install. Ada beberapa group paket diantaranya seperti Desktop, Application, Server. Kemudian klik Next

Kotak dialog Menentukan Jenis Paket

18. Tunggu beberapa saat hingga proses instalasi paket yang telah dipilih selesai semuanya.

Kotak dialog proses instalasi

19. Kemudian akan tampil kotak dialog untuk membuat boot system untuk disket, masukkan disket pada drive A, kemudian klik tombol Next.

Kotak dialog pembuatan disket boot

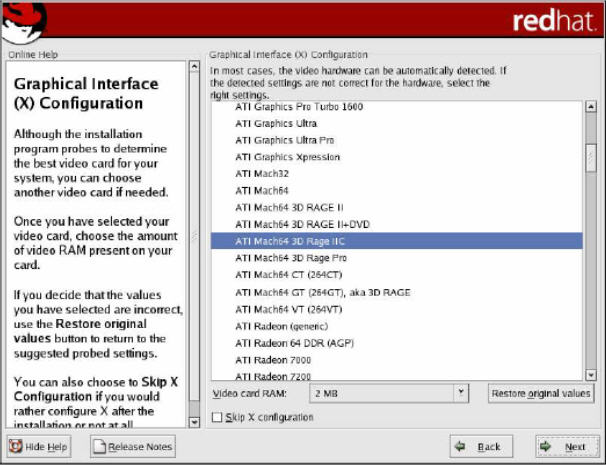
20. Setelah selesai pembuatan disket boot, kemudian akan tampil kotak dialog untuk menentukan jenis Berikutnya installer akan meminta anda memilih konfigurasi Video Card. Umumnya, installer mengenali jenis video card yang ada. Dan juga anda diminta memilih jumlah RAM video card tersebut. Seperti terlihat pada gambar berikut :

Kotak dialog Konfigurasi card monitor

21. Klik Next untuk menentukan jenis monitor yang digunakan dan resolusi yang diinginkan.
22. Setelah anda memasukan dengan benar, maka selesai sudah instalasi Linux RedHat 9.0.


Cara Gampang Membuat Jaringan WiFi (Wireless)

Minggu, 03 April 2011
Aku belum pernah membuat jaringan WiFi sebelumnya, jadi saat kemarin ada kesempatan untuk membuatnya, aku langsung bersedia. Perangkat untuk membangun jaringan wireless ini sendiri semakin hari semakin murah saja. Kali ini jaringan WiFi yang aku bangun tanpa koneksi internet pada jaringan Microsoft Windows.

courtesy http://www.personalcarepc.com

Perhatian : langkah-langkah dibawah ini tidak diperuntukkan bagi pembuatan jaringan WiFi untuk perusahaan skala menengah dan besar.

Perangkat yang dibutuhkan :

  1. Router/Switch Wireless. Beberapa merek yang sering digunakan adalah Syslink, TP-Link dan D-Link. Kecepatan transmisi data wireless yang didukung rata-rata 54Mbps. Untuk pemakaian SOHO (Small Office Home Office) kisaran harga dibawah 400rb-an. Untuk kantor yang kecil atau pemakaian rumah, anda hanya perlu 1 perangkat ini saja.
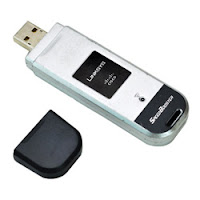
  2. Wireless Adapter. Alat ini digunakan hanya pada PC atau laptop yang belum mendukung akses WiFi. Untuk kemudahaan instalasi gunakan yang bertipe konektor USB, sedangkan untuk ketahanan gunakan yang bertipe konektor PCI. Kisaran harga dibawah Rp. 150rb-an. Cari minimal yang sudah mendukung 802.11 g dan sebaiknya jika membeli lebih dari 1 wireless adapter, usahakan memiliki tipe yang sama.
    Wireless Adapter PCI
    Wireless Adapter USB
  3. Kabel UTP + Konektor RJ-45 (biasanya sebagai bonus pada pembelian Router Wireless)
  4. Jika anda ingin membangun hotspot (WiFi dengan koneksi internet) anda perlu membeli modem ADSL router. Modem ini nantinya dihubungkan ke Router Wireless.

Langkah Instalasi


1. Setup Router Wireless
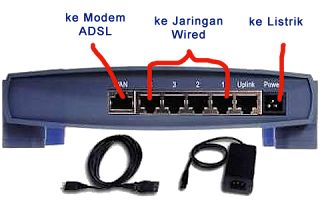
Model Router Wireless bisa bermacam-macam, namun akan memiliki ciri khas memiliki port untuk koneksi ke modem ADSL, port RJ-45 dan port Power. Yang anda lakukan selanjutnya adalah :
  1. Hubungkan kabel UTP ke salah satu port jaringan wired yang ditandai oleh angka 1 - 4, tidak masalah dihubungkan ke port nomor berapapun, dengan komputer/laptop anda untuk operasi SETUP
  2. Hubungkan port Power ke sumber listrik (PLN)
  3. Tunggu beberapa saat hingga router dikenali oleh komputer/laptop
  4. Buka browser internet (Firefox atau Internet Explorer)
  5. Ketikkan alamat IP router wireless tersebut. Untuk router merek linksys adalah http://192.168.1.1 atau baca petunjuk
  6. Ketikkan username dan password untuk login ke menu setup router wireless. Untuk merek linksys ketikkan 'admin' tanpa tanda kutip di kolom username dan password atau baca petunjuk
  7. Jika username dan password benar maka anda akan melihat aplikasi untuk keperluan setting router wireless
  8. Beri nama jaringan wireless (SSID). Berikan nama yang unik untuk membedakan dengan jaringan wireless terdekat (jika ada)
  9. Atur visibility supaya jaringan wireless 'terlihat' (visible). Anda tidak perlu khawatir dengan masalah keamanan, sebentar lagi kita kasi password kok ;)
  10. Atur mode untuk tipe jaringan 802.11 menjadi 'g' saja jika semua tipe wireless adapter anda adalah 'g'
  11. Untuk kepentingan security, pilih dari salah satu tipe enkripsi : WEP, WPA, WPA2. Yang paling aman adalah WPA2. Jika memilih WPA2 anda harus menentukan 'Pre-Shared Key' yang akan berlaku seperti password. Tentukan pre-shared key antara 8-63 karakter. Catat, ingat dan simpan baik-baik pre-shared key ini. Nantinya siapapun yang ingin terhubung ke jaringan wireless yang anda buat, harus mengetikkan pre-shared key yang anda buat sekarang ini.
  12. Simpan setting dengan menekan tombol save, browser anda akan refresh untuk menerapkan setting yang baru dibuat.
  13. Selesai. Cabut kabel UTP dari port RJ-45 di router wireless
Untuk hasil maksimal, tempatkan router wireless ditempat yang tinggi, di tengah ruangan. Sehingga dapat menjangkau setiap komputer/laptop client .

2. Setting Client
  1. Install driver wireless adapter dari CD dalam kotak pembungkus ke tiap komputer yang akan dipasangi wireless adapter.
  2. Koneksikan wireless adapter ke port yang sesuai di komputer/laptop. Jika anda membeli wireless adapter dengan tipe PCI maka anda harus membuka casing PC dan memasangkannya di port PCI yang tersedia. Akan lebih mudah halnya jika anda menggunakan wireless adapter dengan port USB. Jangan lupa matikan PC dan cabut kabel power dari stop kontak sebelum anda membuka casing PC.
  3. Pastikan bahwa wireless adapter dikenali dengan baik oleh komputer/laptop.
  4. Jika wireless adapter terinstal dengan benar, maka di systray akan muncul notifikasi bahwa jaringan wireless terdeteksi
    Jaringan wireless terdeteksi di Windows 7
    Jaringan wireless terdeteksi di Windows XP
  5. Kini anda telah dapat terhubung ke jaringan wireless yang telah anda buat, jangan lupa masukkan pre-shared key jika diminta oleh jaringan.

Sabtu, 04 Agustus 2012

relasi

Relasi

Hubungan/relasi dari himpunan A ke himpunan B adalah suatu pemasangan anggota-anggota A dengan anggota-anggota B.
A. SEBUAH RELASI R TERDIRI DARI:
  1. Himpunan A
  2. Himpunan B
  3. Sebuah kalimat terbuka P(x,y) yang menyatakan hubungan antara himpunan A dengan himpunan B.
    Dimana x bersesuaian dengan a Î A dengan y bersesuaian dengan b Î B.
    ® Bila P(a,b) betul maka a berelasi dengan b. Ditulis a R b
    ® Bila tidak demikian maka a R b
B. SEBUAH RELASI DAPAT DINYATAKAN DENGAN:


  1. Himpunan Pasangan Berurutan (a,b)
  2. Kalimat terbuka P(x,y)
  3. Diagram cartesius ( diagram A x B )
  4. Diagram panah

    ® bila R adalah sebuah relasi, maka himpunan dari relasi ini adalah:

    R = {(a,b) ½ a Î A; b Î B; P(a,b) adalah betul}

    Ket: Jika A=B, maka P(x,y) mendefinisikan sebuah relasi di dalam A.

    contoh :

    R = (A,B, P(x,y))
    A = {2,3,4}
    B = {3,4,5,6}
    P(x,y) menyatakan x pembagi y

    Himpunan penyelesaian relasi ini adalah

    a. Himpunan pasangan berurutan

    R = {(2,4), (2,6), (3,3), (3,6), (4,4)}


    b. Diagram cartesius


    c. Diagram panah


RELASI INVERS

Setiap Relasi dari A ke B, mempunyai relasi R-1 dari B ke A yang didefinisikan sebagai
R-1 = {(b,a) ½ (a,b) Î R}
contoh:
A = {1,2,3}; B = {a,b}
R = {(1,a), (1,b), (3,a)} relasi dari A ke B
R-1 = {(a,1), (b,1), (a,3)} relasi invers dari B ke A

DOMAIN DAN RANGE
Domain (daerah asal) dari suatu relasi R adalah himpunan elemen pertama dari pasangan berurutan elemen R.
Domain = { a ½ a Î A, (a,b) Î R }
Range (daerah hasil) dari suatu relasi R adalah himpunan elemen kedua dari pasangan berurutan elemen R.
Range = {b ½ b Î B, (a,b) Î R}
contoh:
A = {1,2,3,4} ; B = {a,b,c}
R = {(2,a) ; (4,a) ; (4,c)}
Domain = {2,4}
Range = {a,c}

Cegah penyebaran Virus dengan Panda USB Vaccine

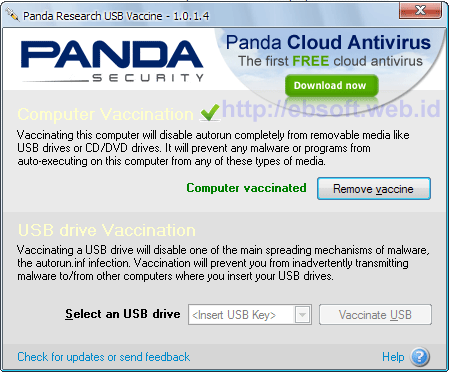
Kemarin (8 Oktober 2009), PandaSecurity baru saja merilis program Panda USB Vaccine 1.0.1.14. Program gratis ini akan mem-vaksinasi komputer atau USB Flash disk sehingga penyebaran virus melalui media seperti flashdisk dapat di hindari (kurangi). Seperti diketahui bahwa penyebaran virus sebagian besar melalui Flash disk.
USB Vaccine Versi baru ini menyertakan perbaikan dari versi sebelumnya dan dukungan multilingual.

panda-usb-vaccine
Salah satu celah keamaan Windows ( terutama windows XP, termasuk pula windows Vista ) adalah penggunaan file AUTORUN.INF di removable drive, seperti USB Flash disk. Jika fitur windows Autorun ( Otomatis menjalankan file AUTORUN.INF) tidak di matikan, maka virus dengan mudah menyebar ke komputer meskipun kita tidak membuka USB Flashdisk.
Panda USB vaccine mempunyai dua fitur utama :
  • Computer Vaccination, yang akan mem-vaksin komputer (PC), mematikan fitur Autorun Windows. Sehingga jika ada file AUTORUN.INF di USB Flashdisk, CD, DVD, MP3 player atau media lainnya tidak akan otomatis dijalankan.
  • USB Drive Vaccination, mem-vaksinasi USB Flash drive. USB Vaccine akan membuat file AUTORUN.INF kosong yang tidak bisa di baca, edit (modifikasi) atau di hapus. Sehingga virus tidak akan bisa memanfaatkan AUTORUN.INF untuk menyebar secara Otomatis ke komputer lain.
Perhatian..
Setelah USB Flash Drive (Flashdisk) di vaccine, maka file AUTORUN.INF yang telah dibuat tidak akan bisa di hapus melalui windows. Dan tidak ada fitur di USB Vaccine untuk menghilangkan file ini. Jika karena suatu hal terpaksa akan menghapus AUTORUN.INF, maka bisa dilakukan melalui bootable CD atau melalui Linux. Atau dengan cara mem-Format Flashdisk tersebut ( Jika di Format, semua data akan hilang, sehingga perlu di pindah terlebih dulu).
Perlu di ingat juga bahwa, setelah Flashdisk di vaksin dengan program ini, bukan berarti virus tidak dapat masuk. Virus tetap saja bisa masuk ke flashdisk, hanya saja tidak akan bisa otomatis berjalan atau menular ke komputer tanpa kita aktifkan. Sehingga perlu waspada sebelum menjalankan file yang ada di flashdisk. Informasi dan Pengunaan lebih lanjut, bisa dibaca artikel saya sebelumnya tentang Proteksi dari autorun.inf dengan Panda USB Vaccine

cheat pool

cheat pool by Franz the Hackers

Aiming Assist khusus NOefect

Jumat, 08 Juni 2012
setelah update total mengenai pool 8ball ruler kemarin !!!

kayaknya bosan khusuh yg berefek ja khan!!

sekrang gan q sharing yg tdk berarah !!!

penggunaan arahkan ja pada bola yg ingin ditembak cocokkan baris meja cheat dgn meja pool qmu!!


lngsung sedot ja ne!!!

ne ss nya!!

Pool, Facebook, Aim Assist, Aimer

By This tool you can easily aim the pool balls to the hole .. So just download and open it while you are playing pool live tour..
How to aim :--
  • Press ctrl+left click for aim ..
  • Hold shift for go transparent..
  • Press on settings button for changing the colour of the aimer..
follow dlu lah gan!!

background fb keren............

background fb lebih asyeek
merubah beckground/tampilan facebook
Sabtu, 09 Juni 2012
pertama install dulu addons nya disini
dan ini hasilnya whwhwhhw
ko ngga jadi whwhwh ya kan blum selesai trus kalo udah install addons nya
kita masuk website untuk merubah tampilan ke sini trus pilih mau tampilan kaya apa
klik tampilan yang mau di pilih trus install with stylish
selesai dah liat  facebook mu

Jumat, 03 Agustus 2012

GADGET BARU: Acer Luncurkan Iconia A701 - Bisnis.com

Postingan Populer

Popular Posts

New Tutorial


Postingan Populer

New Story of My Life

Follow Us With Facebook

Copyright© 2011 edigunawan naibaho | Template Blogger Designer by : Utta' |
Template Name | Uniqx Transparent : Version 1.0 | Zero-Nine.Net